
LSAT Preptest 33 LG Explanations
Full explanations for every question from the logic games section of LSAT Preptest 33.
Archived Logic Games explanations
Logic Games are no longer part of the LSAT. LSAC removed the Logic Games section beginning with the August 2024 LSAT. If you are studying for the current LSAT, you can skip this section.
These explanations remain available for students, tutors, and readers using old-format PrepTests. For current guidance, see Logic Games and the current LSAT.
Table of contents
Game 1: TV Ranking
Game 1 Setup
This is an explanation of the first logic game from Section IV of LSAT Preptest 33, the December 2000 LSAT.
Seven TV programs (H, J, L, P, Q, S, V) were given rankings from first to seventh. The game’s rules allow you to determine possible orders for the programs.
Game Setup
This is a pure sequencing game (sometimes called “ordering”). It’s the easiest type of game to master. Once you can do one, you can do all of them.
Generally, all of the rules can be combined into one large diagram. Start with one rule, and add each one on to the diagram.
Note that “most popular” is on the left. This diagram shows that H is more popular than J and L.

The next rule can go directly on the diagram. J is more popular than Q:

I’m drawing Q going up rather than down because I read all of the rules and foresaw that everything fits together better this way. Rules 3 and 4 show that S comes after both L and Q, so I want to be able to fit that in.
You must read the diagram left to right. If two variables are connected by lines running left to right, then one is before the other. So H is before Q, but L isn’t necessarily before J. No lines connect J or L.
Here I’ve added rules 3, 4 and 5 to the diagram. P is after Q. V is after L, S is after L and Q, and S is not 7th.

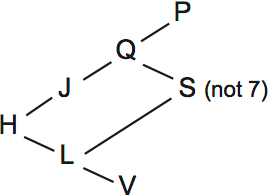
Game 1 Main Diagram
This diagram shows the rules used to determine TV programs’ rankings (H, J, L, P, Q, S, V).
Refer to this diagram when solving this game. Copy it on your own page, and on each question make a new version in order to follow along with my explanations. You’ll learn much more if you draw along.
The setup section explains how to build this diagram.
Main Diagram
Question 1
As with all list questions, you should use each rule in turn to eliminate the wrong answers.
A is wrong. H has to be more popular than J (rule 1).
B is wrong. J has to be more popular than Q (rule 2).
C is CORRECT.
D is wrong. L has to be more popular than V (rule 3).
E is wrong. S can’t go last (rule 5).
Question 2
I found it useful to redraw the diagram beside the question. It’s really not hard to do. You just look at your diagram, and modify it based on the rules.
The the new rule tells us J is before L. So draw H-J-L (keeping the old rule that J is before Q).
The second new rule is that S is before P. So you can add that as well. Here’s what it looks like:

It should only take about 5-15 seconds to draw that. If it takes you longer, practice modifying the diagram a few times on your own. Have a friend give you a new rule, and redraw the diagram based on that.
It’s an important skill for pure sequencing games.
Redrawing diagrams is a purely mechanical process, and so it’s quite trainable.
From the diagram, A is CORRECT. J is second.
B is wrong because only H can go in front of J.
C and D are wrong because either Q or L can go third.
E is wrong because V could go seventh instead.
Question 3
To go third, a variable must have less than three letters that come in front of it. There also must be at least two variables that could go in front.
To solve these questions, look at the letter in the answer choice, and count. I recommend physically using your finger; it’s much harder to make a mistake, and it forces you to take action.

E is CORRECT. H, J and Q all have to go in front of P, so P can go fourth at the earliest.
For the other answers, I’m going to say who could go in front of the letter to make them third:
L: HJ
J: HL
Q: HJ
V: HL
Question 4
As with question 2, I recommend drawing a new diagram for this question. Practice doing it on your own. You should be able to get fast at it, and doing this lets you solve the questions with certainty.
Getting skilled at redrawing your diagram will help you with any sequencing game.
J goes after L, and V goes before Q.
Only S and P are left to go after Q. P has to go last, because S can’t.

There’s only one point of uncertainty. We don’t know whether J or V will go first.
D is CORRECT.
All of the wrong answers are directly contradicted by the diagram.
Question 5
Here’s what the new diagram looks like. Shift Q in front of L, and keep V and S after L:

B is CORRECT. L could be fifth, if P goes before L.
The diagram shows that all of the other answers have to be true.
Game 2: Birds Forest
Game 2 Setup
This is an explanation of the second logic game from Section IV of LSAT 33, the December 2000 LSAT.
Bird-watchers are trying to find out what kind of birds are present on a certain forest. The six birds are grosbreak, harrier, jay, martin, shrike, and wren (G, H, J, M, S, W). The rules allow you to determine what birds can be present together.
Game Setup
This is an in-out grouping game. Like pure sequencing games, this is a very important type of game to learn. Once you know how to do one of these games well, you can do all of them.
There are two ways to set up these games. A slow way, and a fast way that makes you actively think about the rules.
The slow way is to draw out each rule individually, and draw its contrapositive. People think this helps them avoid mistakes. But as an LSAT tutor, I get to watch people try this method. They usually get lost in a sea of diagrams.
Worse, they don’t think about the rules as they draw them, or how the rules fit together. They rarely connect everything into a larger diagram, and the game goes badly.
The fast way is to start with one rule, and add each new rule to the diagram. In almost all in-out grouping games, you can join the rules into one diagram. This process forces you to think about the rules and actively learn the game.
Let me show you how that works. Here’s the first rule:
![]()
If H is in, G is out. The next rule joins on this directly: if J or M are in, H is in too.

So if, for example, J is in, then H is in and G is out. We don’t know about M, because J and M aren’t connected.
The next rule requires you to take the contrapositive. If W is in, G is in. So if G isn’t in, then W can’t be in either:

This can also be added directly to the diagram. You can always join a necessary condition to a sufficient condition if the term is the same (e.g. “not G”).

We can also take the contrapositive of the last rule and add it to the diagram. If J is out, S is in.
![]()
Contrapositives shouldn’t be hard. You just switch the terms, and put a line through them (or remove a line).
So if S is out, J is in:
![]()
This can be added to the left of the diagram:

Voila! A full diagram. Every rule is there.
A note on how to read this diagram: you can only go left to right. So If J is in, then H is in, and GW are out.
But you don’t know anything about S, because S is to the left of J. Your diagram doesn’t tell you what happens to S if J is in. S could be in if J is in.
Taking the contrapositive of the main diagram
You’ll want to take the contrapositive of the diagram. Then you’ll have two large diagrams that tell you everything.
Start by reversing everything, then negating it. Negating means putting a line through everything, or removing a line.
So we start with W being in. This forces G in, and this causes H to be out:

It’s important that “or” becomes “and” in a contrapositive, and vice versa. I’ll explain why with an example. Suppose I say:
“If you have a boy or a girl, you’re a parent”.
The contrapositive is:
“If you’re not a parent, you don’t have a boy and you don’t have a girl”.
Jays and Shrikes can both be in
A quick note on the rules about S and J. They confuse most people that try this game. Here’s the rule again, and the contrapositive:

If one is out, the other is in. That does not mean that if one is in, the other is out! They’re completely different things.
This is the biggest point of confusion in this game, and it comes from not fully understanding the diagrams. You must read them left to right.
So look at the diagrams above. If J is out, the arrow tells you S is in. But if S is in, the arrow doesn’t tell you anything. You can’t go left.
At least one of S and J will be in, but they could both be in.
H and G have the opposite relationship. At least one will be out, and they might both be out. If H is in, G is out, and vice-versa. But they could both be out.
Game 2 Main Diagram
These diagrams show the rules used to determine which of the birds (G, H, J, M, S, W) can be in the forest together.
Refer to these diagrams when solving this game. Copy them on your own page, and on each question make a new version of them in order to follow along with my explanations. You’ll learn much more if you draw along.
The setup section explains how to build this diagram.
Main Diagram


Review of How to Read the Diagrams:
- You can go left to right, and only left to right. Follow the arrows.
- If a positive variable (no line) leads to a variable with a line through it, then at least one is out (e.g. G and H). They could also both be out.
- If a negative variable leads to a positive variable, at least one if in (e.g S and J). They could both be in.
- If you start at a certain point on a diagram, then go rightwards from that point.
- Example: H is out. You know M and J are out, and S is in.
You don’t know anything about W and G, because they’re to the left. They could both be in, or both be out. Or W could be out and G could be in.
Question 6
This is a harder than most first questions. It’s difficult to consider birds not in the forest.
Use your two diagrams to see what happens if the birds listed in the answer choice are out.
I’ll use answer A as an example. Check where “not J” is listed in your diagram. And then see if that forces anything else out, or forces something from the answer choice to be in.

It does. A is wrong because if J is out, S has to be in, not out. (rule 4).
B is wrong because if G is out, W is out too (rule 3).
C is wrong because if G is out, W is out too (rule 3).
D is CORRECT. Some people skip over this because it’s the longest. But it obeys the rules!
E is wrong because if S is out, J is in. That forces H in, which forces G and W out, too. But G and W aren’t in this answer choice.
Question 7
Look at your diagram to see what happens if M and H are in:

G and W are out. We don’t know whether S and J will be in or out.
One will be in, because one of them always is, but we don’t know which one. And they could both be in.
Remember, J being in is not a sufficient condition for S being out. You can only read the diagram left to right.
If you’re still unclear about why J and S can be in together, reread the setup.
A and B could be true, but don’t have to be.
C can’t be true. One of S and J has to be in.
D is wrong. Two more birds could be in (S and J), but they don’t have to be.
E is CORRECT. Since G and W are out, only S and J are left.
Question 8
With in-out games, local rule questions can usually be solved with a three step process:
- Find the local rule on the diagram.
- See what has to be true.
- Check if that is the answer.

If J is out, S has to be in. That’s all we know.
We don’t know a single thing about M or H. A-C are wrong.
D is CORRECT. S has to be in the forest.
E is wrong. You can only read the diagram left to right, from the point where you start. So we have no idea whether W, H, H and M are in or out.
So there’s no reason E has to be false. H could be in, and W, G and M could be out.
Question 9
This is a counting question. Look at both diagrams, and see how many birds can be in.

If W is in, then W, G, and S are in. That’s 3 birds.
On this diagram, S, J, M and H are can be in. That’s 4. C is CORRECT.
Yes, you read that right. S can be in. Here’s how.
Start with J in. Don’t start with S out – you’re trying to put birds in!
If J is in, H is in. You can also put M in. J, M and H make three.
Only S is left. You don’t know anything about S if you start with J. Remember, you can only read the diagram left to right.
You can also put S in. Both S and J can be in together. S, J, M and H make four.
Review the setup if you’re not sure why S and J can both be in.
Question 10
Here, you have to look for a relationship where one bird being in forces another bird out.
H and G are an example (but not the answer). If H is in, G is out.
![]()
So look through your diagram looking for that type of symbol.
Luckily for us, the first answer is right. If J is in, W is out. This diagram shows it:

A is CORRECT.
B is wrong. J and S can be together. One of them always has to be in, but they could both be in.
C is wrong. If W is in, S is in:
D and E are wrong. There’s no rule connecting J and M or S and M.
J and M are mentioned together in rule 2, but they have no effect on each other.
Question 11
Follow the same process I mentioned in question 8. This works for most local rule questions on in-out grouping games:
- Find the local rule on the diagram.
- See what has to be true.
- Check if that is the answer.

If G is in, H, M and J are out. S is in. That’s all we know.
A is CORRECT. S has to be in.
Question 12
This question adds a new rule. You should simply add it to your diagram, as if it were an extra rule from the setup.
Here’s how to draw the new rule and the contrapositive:

I add both the rule and the contrapositive to the diagram. This captures the full effect of the new rule, and prevents me from forgetting about part of it.

For instance, suppose I just added the part at the left. Then if M were in, I might forget that S were out. Better to add both.
If you just added H ➞ Not S on the right, you might forget that H leads to J.
There’s no rule against having the same variable twice in a diagram. It doesn’t mean H is in the forest twice.
Here’s the contrapositive:

A is wrong. Now, if S is in, J is out.
B is CORRECT. If W is in, S is still in.
C is wrong. If M is in, S is out.
D is wrong. If J is out, S is in. And if S is in, M is out.
E is wrong. On question 9, we saw we could have up to four birds in the forest. But that was before the new rule. Now S can’t be in with J, H and M, so we can only have three.
Game 3: Stones
Game 3 Setup
This is an explanation of the third logic game from Section IV of LSAT Preptest 33, the December 2000 LSAT.
A jeweler has a selection of ten stones. There are three rubies (r: F, G, H); three sapphires (s: J, K, M); and four topazes (t: W, X, Y, Z). The jeweler must choose six of these stones to make six rings.
Game Setup
Numbers are very important in this unusual game. The jeweler will pick six out of ten stones.
Your first step should be listing your variables, since the variable list is unusually important for this game:

Note that rubies are early in the alphabet, sapphires are in the middle, and topazes are late in the alphabet. LSAT variables often follow this pattern, which makes them easier to remember.
At least two topazes are selected. This is extremely important to remember, and you should internalize it somehow. There’s no magic symbol that will make this work. You can draw “2” beside topazes, or something equivalent.
Just find some way to commit it to memory.
The next rule is also important:
![]()
Two sapphires lead to one ruby, which leads to three topazes, because we need six gems. You must remember that having two sapphires is special.
The next two rules can be connected. If M is in, W is in. And if W is in, H and Z are out. I’ve also shown the contrapositive:

You can’t have both W and Z at the same time. W and Z are both topazes, and you need at least two topazes.
So if you can have at most one of W and Z, then you must need at least one of the other topazes: Y or X.
This deduction solves question 17.
If you want, you can draw this in a table as a reminder:

One of X and Y is in, and one of Z and W are out.
There is one more major deduction, that comes in question 14. We need three stones from at least one of the types of stones. There’s no other way to get six.
We can’t have two of each type, because if we have two sapphires, rule 2 comes into effect.
We can’t have four topazes and two of another type, because W and Z can’t be together.
If we try one sapphire, and fewer than three rubies and three topazes, then we can’t get six stones.
So we need three of one type. The possible numerical distributions are:
- 3 and 3
- 3, 2 and 1
I’ll talk about this more in question 14, which is the question that tests this deduction. This is a hard deduction. Almost no one gets it during the setup, the first time they do the game.
Game 3 Main Diagram
These diagrams show the rules used to determine which of the ten precious stones (F, G, H, J, K, M, W, X, Y, Z) will be chosen to make six rings.
Refer to these diagrams when solving this game. Copy them on your own page, and on each question make a new version of them in order to follow along with my explanations. You’ll learn much more if you draw along.
The setup section explains how to build this diagram.
Main Diagram
Rules
This main diagram is a bit messier than usual, since this is a messy game. The most powerful strategy on a game like this is simply memorizing the rules. This isn’t hard to do if you read them a few times.
1. At least two topazes
2. ![]()
3.

4.

Question 13
As with all list questions, take the rules and apply them one by one to eliminate answer choices.
A is wrong because if M is in, W has to be in (rule 4).
B is wrong because we need two topazes. Only W is in.
C is wrong because if there are two sapphires (F and G), then we need one ruby, not two. J and K are both in.
D is CORRECT.
E is wrong because if W is in, Z is out (rule 3).
Question 14
This question is hard, but the resulting deduction is incredibly useful for the rest of the game. The easiest way to find the right answer is to create a scenario or two to disprove wrong answer choices.
A-D are wrong. We don’t need G, J or X. And, we don’t need one stone selected from any type. This scenario proves all of those answers wrong:

Feel free to read through the rules to try to prove me wrong, but this scenario obeys all of them.
E is CORRECT. It turns out, we always need at least one type of stone to have three stones.
Let’s try our best to create a counterexample. I’ll walk you through the process I used to solve this question on my own. So we want to try to make a workable scenario, where we don’t have three gems of any one type. If we can’t, we know this answer is right.
Let’s look at sapphires. Obviously we can’t use three: that would help prove what we’re trying to disprove.
If we have two, then we have one ruby (rule 2). That means we need three topazes to make six gems. D’oh!
That didn’t work. Let’s try one sapphire instead.
We need five other gems. We can’t have all four topazes, because W and Z can’t go together. So we can try two topazes.
So far we have one sapphire, and two topazes.
We can add two rubies (we can’t use three, because we’re trying to avoid that). But that still only makes five gems.
So there’s no way to get six gems without having three of at least one type. This happens because we can’t have all four topazes.
Question 15
If Z is selected, we know we don’t have M and W:

We don’t know anything about H, because Z and H aren’t connected by an arrow.
This deduction disproves A-C. M, a sapphire, can’t be included.
D can’t be true. If Z is in, we can have, at maximum, three topazes and two sapphires. That only make five gems.
So we need rubies to make six gems.
E is CORRECT. This scenario shows how we could have no sapphires:

Question 16
If we have two rubies, then we can’t have two sapphires, thanks to rule 2. If we had two sapphires then we would have one ruby.
What happens if we have three sapphires? Two rubies, three sapphires, and…one topaz? That doesn’t work, we don’t have enough topazes. We need at least two (rule 1).
So we need two rubies, one sapphire and three topazes.
D is CORRECT.
E has to be false, because of rule 2. Two sapphires leads to one ruby.
A-C are wrong.
There’s no reason you need H, K or Z. This diagram shows one way to make a scenario without them:

(note that this diagram also shows that E is wrong).
Question 17
I talked about this in the setup. We’re always missing one of W and Z. They’re both topazes.
We always need two topazes. If we can only have one of W/Z, then we need at least one of X/Y to get two topazes.
D is CORRECT.
If you’re unsure about any of the other answer choices, the surest way to eliminate them is to draw scenarios as counterexamples.
It helps to look back at past questions; all of my scenarios below come from earlier questions.
This scenario shows that A and C are wrong:

We don’t need rubies, and we don’t need F or Z.
This scenario shows that B is wrong:

We can have three rubies.
This scenario shows that E is wrong:

We don’t need X or Z.
Question 18
J and M are the only two sapphires. That triggers rule 2. We have one ruby, and therefore three topazes.

One of the topazes is W, thanks to rule 4.
![]()
We also know we can’t have H and Z.
We need two other topazes. Since we can’t use Z, we must have both X and Y instead.

The single ruby can be F or G.
A is wrong. We can only have one ruby.
B is CORRECT. We need X, and we can have F.
C is wrong. If M is in, W is in and H is out.
D is wrong. The question said K isn’t one of the sapphires selected.
E is wrong. If M is in, W is in and Z is out (rules 3-4).
Game 4: Store Lights
Game 4 Setup
This is an explanation of the fourth logic game from Section IV of LSAT 33, the December 2000 LSAT.
There are ten adjacent stores on Oak Street, five stores on the north side (1, 3, 5, 7, 9) and five on the south (2, 4, 6, 8, 10). The stores are facing each other in pairs: 1 and 2, 3 and 4, 5 and 6, 7 and 8, and 9 is facing 10. Each store has lights in one of these colors: green, red, and yellow (G, R, Y).
Game Setup
This is a fun game. Starting from a couple of facts, you can figure out almost everything.
A couple of ground rules:
- The same color can’t be beside itself, or across from itself.
- You need one and only one yellow light on each side.
It’s easiest to do a horizontal layout for this game:

You can see they use this same layout in the first question.
Next, fill in the rules 4 and 5 on the diagram. 4 is red and 5 is yellow:

Two stores across from or beside each other can’t be the same color. So 3 and 6 have to be green.

1 has to be red, because 3 is green and yellow has already been used in the top row.

Most people would stop here, and try the questions.
But an extremely useful LSAT logic games principle is: “If something can only be drawn one of two ways, try drawing it both ways.”
In this case, store 2 can only be green or yellow.
If it’s yellow, everything falls into place.
Store 8 has to be red, because 6 is green. There are no yellow lights left, since each row has its yellow lights.

That means 7 and 10 are green, and 9 is red.

Now, what if store 2 is green?

Well, not much happens. But it’s very useful to know that everything is decided if store 2 is yellow.
Game 4 Main Diagram
These diagrams show the rules used to determine the colors of the stores’ lights (G, R, Y) on the street.
Refer to these diagrams when solving this game. Copy them on your own page, and on each question make a new version of them in order to follow along with my explanations. You’ll learn much more if you draw along.
The setup section explains how to build this diagram.
Main Diagram

(Base diagram: we don’t know store 2’s color)

(if store 2 is yellow)

(if store 2 is green)
Question 19
As with all list questions, take the rules one at a time to eliminate wrong answers.
A is wrong because each row needs one yellow.
B is CORRECT.
C is wrong because store 5 is yellow. Store six (in the middle) is across from store five, the same color can’t be across from itself.
D is wrong because our setup showed that stores 4 and 6 were red and green, not green and red. Light 3 is green, so light 4 can’t be green:
E is wrong because there are two yellow.
Question 20
Local rule questions can be solved with a three step process:
- Draw the new rule.
- See if you can make a deduction.
- Check if that deduction is the answer.
I’ll show you how it works in practice. First, you reproduce the main diagram. It shouldn’t take long, 5-15 seconds. You don’t need to reproduce the numbers for the local version.
Then you add G in 7.

Then you see what you can deduce. 9 has to be red, since it’s the only color left. G can’t go beside itself, and Y is already in spot 5.

Now, we check if that is the answer. It is! D is CORRECT.
Done correctly, this can be a 15-30 second process.
None of the other answers have to be true. As we saw in the setup, store 2 can be green or yellow, so A and E are wrong.
And if store 2 were green, then either 8 or 10 could be yellow. So B and C are wrong.
Question 21
This tests whether you made the deductions in the setup. Here’s the main diagram again:

B is CORRECT. Store one has to be red.
I’ll review how to make that deduction.
4 is R, and 5 is Y. That means 3 is G, since the same color can’t be beside or across from itself.
That means 1 can only be R. It can’t be G, because 3 is G. It can’t be Y, because the Y for the row has already been used for store 5.
Question 22
Here’s our main diagram. We have two G’s. We need 5. So you need to think about how to put 3 more G on the diagram. For any two spaces such as 7 and 9 or 8 and 10, at most one of them can be green.
So we can put one green in 7-9, one in 8-10, and one in 2.
Store 8 can’t be green, because 6 is green. But we can make store 10 green.

In any two spaces, like 7 and 9, you can only put one G. Here, we can make 7 green. 9 won’t work, because 10 is green.

9 has to be red, because store 5 used up the yellow in the top row.
We have four G so far. For the fifth G, we must make store 2 green.
We also need to put one Y in the bottom row. That will have to go in store 8.

E is CORRECT.
Question 23
A new rule – there are two yellows on the bottom!
Start with your main diagram, and make sure the new rule doesn’t change anything:
It doesn’t. 6 and 3 still have to be green, because they’re beside and across from a red and a yellow. 1 still has to be red, because it’s beside a green, and the yellow for the row has already been used.
So, we have to fit two yellow onto the bottom row. We can fit one yellow in either space 8 or 10, but we can’t put two there.
That means we also need to put a yellow in store 2.
D is CORRECT.

Leave a Reply