
LSAT Preptest 90 LG Explanations
Full explanations for every question from the logic games section of LSAT Preptest 90.
Archived Logic Games explanations
Logic Games are no longer part of the LSAT. LSAC removed the Logic Games section beginning with the August 2024 LSAT. If you are studying for the current LSAT, you can skip this section.
These explanations remain available for students, tutors, and readers using old-format PrepTests. For current guidance, see Logic Games and the current LSAT.
Table of contents
Game 1: Five Phone Calls
Game 1 Setup
This is a sequencing game. We have five phone calls to Quinn, Roth, Smith, Teng, Vitt, each being either local or nonlocal. Right off the bat, we know that there’s five slots, and that each call has to be labelled either L or N.
- Rule 1 gives us the order S – QV
- Rule 2 says that S and V can’t both be Local or Non-Local. They must be different types.
- Rule 3 says that Q and T are both Local
- Rule 4 tells us that the third call is Non-Local. We can immediately infer that Q and T can’t be third.
The easiest way to go about this game would be to look at the most restricted element, which is the third slot.
Q and T can’t be third, so only R, S, and V can be third. From here, we can break this game into three diagrams.
Scenario 1: R is third
In the first scenario, let’s put R in third. This creates two blocks of two spaces on either side of R. S – QV are the most restricted variables left to place, since QV take two slots. In order to make S – QV work, we have to put QV after R, and S before.

Q and V are forced into slots four and five. S and T go in either the first or second slots. Remember that both Q and T are local. S and V could be either local or nonlocal, as long as they’re different.
Scenario 2: S is third
In the second scenario, let’s put S third, which means that Q and V are fourth and fifth (rule 1), and V is Local (rule 2). R and T go in the first two slots, in either order.

Scenario 3: V is third
In the third one, V is third, and thus Nonlocal. This means that S has to be Local (rule 2). And SQ have to be immediately before V (rule 1). T and R would be in slots four and five, not necessarily in that order.
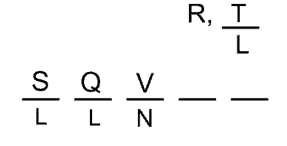
Remember that in all of these diagrams, both Q and T are Local (rule 3)
These three diagrams easily solve all questions! When deciding whether to make split setups like this, the question to ask is whether they are limited in number. 2-3 setups is usually a good number for a split.
Game 1 Main Diagram
The setup section explains how to build this diagram.
Main Diagram
This is a sequencing game. There are five phone calls made to Quinn, Roth, Smith, Teng, Vitt. The calls are local or nonlocal. There are five slots, and each call is either L or N.
The setup section explains how to build these diagrams.
Rules

Scenarios

Question 1
For acceptable order questions, go through the rules and eliminate answers one by one. You can also refer to your main diagram if you need help visualizing this.
Note that I use the rules themselves. I don’t use my diagrams for these questions. Reading the rules again for this question will help you memorize them, and it’s also more efficient.
Rule 1 eliminates A. Quinn has to go directly before Vitt.
Rule 2 eliminates C. Smith and Vitt need to be different types of calls.
Rule 3 eliminates E. Quinn’s call has to be local, not nonlocal.
Rule 4 eliminates D. The third call has to be nonlocal.
B is CORRECT. It violates no rules.
Question 2
R is second so that means we can’t be looking at Scenario 1 (R is 3rd) or Scenario 3 (Q is 2nd there), so we’re left with scenario 2, with S third and QV 4th and 5th. Here’s scenario 2:

Since R is second, the only spot left for T is first:

Almost everything is decided! The only uncertainty is whether R is Local or Non-Local.
Since T was the final deduction, we should first check if an answer mentions T, or the first call. D does! And it is CORRECT: T is first and local (rule 3).
None of the other answers are possible. It’s good to quickly skim them and check against the diagram though, in case of a diagramming error. This should only take 5-10 seconds at most.
Question 3
This question gives us a new rule: T is fifth. You should draw that first. From our three scenarios, T can only be 5th in scenario 3. Here’s scenario 3:
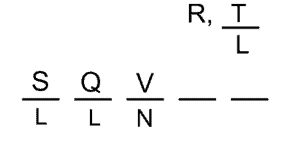
Placing T 5th forces his forces R 4th:

Almost everything is determined in this question. The only thing remaining is whether R is local or nonlocal. Since this is a could be true question, it is asking about remaining possibilities, so the right answer will almost certainly be about R/the fourth call.
A is CORRECT! The fourth call can be nonlocal, because R can always be nonlocal.
None of the other answers are possible. The first two calls have to be local: S because of rule 2, S must be different from V, which is third and nonlocal. And Q must be local because of rule 3: Q is always local. So B and C are wrong.
D and E are wrong because they contradict the new constraint that T must be 5th. For D, if S is third, then QV have to be fourth and fifth (rule 1), blocking T from being fifth.
For E, if R is first, then only S and V are left to go third. If S is third, QV are fourth and fifth. If V is third, then SQ are first and second (so R can’t be first!).
Question 4
This question tells us that Roth’s call was local, which automatically rules out it being third (due to Rule 4).
That means we are in scenario 2 or 3:
Scenario 2:

Scenario 3:
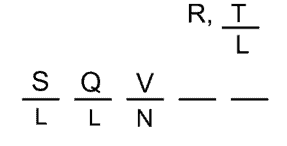
Since this is a must be false question, before making any further drawings you should simply check if one of the answers contradicts both scenarios. S, Q and V are likely candidates, as they have set positions in each diagram. You can eliminate answers if the answer is possible in either scenario.
Scenario 2 eliminates A: Q can be fourth
B and D are not good candidates, as both R and T are flexible: between the two scenarios they can each go anywhere except third.
C is CORRECT. S can’t be second in either diagram.
The second scenario eliminates E: V is fifth in that scenario.
Note that you also could have eliminated the answers using a prior question and using impossibility.
Question 2 eliminates B and D. The scenario there placed R second and T first.
It is impossible for A or E to be correct. This is because if Q is fourth (A) then V is fifth (E), and vice versa. The answers are either both true or both false, and we can’t have two correct answers, so you can eliminate both.
Question 5
This question tells us the first call was nonlocal. If the first is nonlocal and the third is also nonlocal, then this heavily restricts T and Q: both need to be local, so neither T nor Q can be first or third.
QV are the most restricted, since we need two slots for them and now Q can’t be local. So let’s think about where to put them. We can’t put them second:

The problem is that S goes first to be in front of Q (rule 1), but rule 2 says that S and V need to have different call types. However, for this question calls 1 and 3 are both nonlocal. Meaning S and Q would be the same call type.
So, we instead need to put QV fourth and fifth:

The next most restricted variable is T. It has to be a local call, so it can only go second, because 1st and 3rd are both nonlocal:

S and R are the two others left to place. They can go in either slot. The only restriction on S is it needs to have a different type of call than V. Since only 1st and 3rd are open to S and both those calls are nonlocal, this forces V to be local.
This question is about how many call’s positions are fixed. There are three calls fixed, T, Q and V. So C is CORRECT.
This analysis eliminates all other answer choices. T, Q and V are fixed, so A and B are wrong: three need to be fixed, not 1 or 2. R and S aren’t fixed, so more than three calls being fixed isn’t correct either.
Game 2: Six Coworkers Play Tennis
Game 2 Setup
This is a grouping game. Six coworkers are playing three games, and they can only play one game each.
The rules are as follows:
F and G can’t be first, and J and L can’t be third. You can draw this directly on the diagram:

Then, F must play against G or H, and J can’t play against G. And M has no rules, so it is the random variable, which you can represent with a circle around it:

You should always look for the most restricted variable in logic games. Here, it is F: it can’t be in group 1, and it must be with G or H. That means F + G/H are in either groups 2 or 3. We can make this into two scenarios.
Scenario 1: F is second
First, let’s see what happens if we put F and G/H second:

The next most restricted variables are J and L. They can’t go in group 3. So since group 2 is full, J and L must go first:

Only M and one of H/G are left to place, so you can put them in group 3. The only uncertainty is which of H/G goes in group 2, and which in group 3:

Scenario 2: F is third
Next, let’s see what happens if we put F + G/H third:

It turns out, not much: we can’t deduce anything else. J, L, M, and one of G/H are left to place. But it’s still helpful to have this diagram, as we can see a few general constraints:
- J can’t be with G
- G can’t be first
- Beyond those two rules, any placement is allowed
The two scenarios in this game are quite limited: when F is second, almost everything is decided. When F is third, there are still only limited options for what’s left to place, as group 3 is totally full.
Game 2 Main Diagram
The setup section explains how to build this diagram.
Main Diagram
Refer to the setup to see how to make this diagram.
Rules


Scenario 1

Scenario 2

Question 6
For acceptable order questions, go through the rules and eliminate answers one by one. You can also refer to your main diagram if you need help visualizing this.
Note that I use the rules themselves. I don’t use my diagrams for these questions. Reading the rules again for this question will help you memorize them, and it’s also more efficient.
Rule 1 eliminates A. F can’t be first.
Rule 2 eliminates B since L can’t play in the third game.
Rule 3 eliminates C since F can only play against G and H, and no one else.
Rule 4 eliminates E since G and J can’t play against each other.
So D is CORRECT.
Question 7
If Martha plays in the third game, this forces F and one of G/H into group 2. This is because F must be with G or H (rule 3), so we need two spaces. And F can’t go in group 1 (rule 1):

This in turn forces J and L into group 1, because they can’t go in group 3 (rule 2), and group 2 is full:

At this point, we have some deductions and we can check the answers: D is CORRECT, Luis has to play against Jasmine.
Question 8
If Jasmine plays in the second game, then G can’t go second (rule 4). And G can’t go first either (rule 1). So, this means G must be third:

The next most restricted person is F: they must play against G or H, needing two spaces. They can’t be in group 1 (rule 1), and group 2 only has 1 space (because J is there) so F + G/H can only go in group 3. F thus plays with G and therefore F cannot go with H:

H, L and M are left to place, and they can each go anywhere. At this point we can check our answers. A–D are all wrong, as they involve F and G not playing against each other. Yet we know they must.
E is CORRECT. We can play H and L in group 1, and then M in group 2 with J:

Question 9
F can play against H in either Game 2 or Game 3. Let’s draw both scenarios and see what we can deduct: one with FH second, one with FH third.
G can only go in groups 2 or 3 (rule 1). Since FH fill one of those groups in each scenario, that forces G to go 3rd in scenario 1, and 2nd in scenario 2:

J can’t go with G (rule 4), so this in turn forces us to place J in group 1. In scenario 1 we also must place L, since it can’t go in group 3 (rule 2):

Only M is left to place in scenario 1, and only M, L in scenario 2. The question is asking for something that must be true, and since J is in group 1 in both groups, that is the only possible answer. C is CORRECT.
(I didn’t draw in M and L because there’s no point to completing diagrams once you already answer a question. When you get far enough through the logical steps and hit “could be true” situations, you should check the answers to see if you already solved the question.)
Question 10
For this question, you can use past questions to see who can go second.
- The right answer to question 6 proves that H and L can go second.
- Question 7 proves that F, G or H could go second.
- Question 8 proves that J and M can go second.
Diagram from question 7 for F, G and H:

Diagram from Question 8 which shows M and J can go second:

So, in fact, everybody can go second! E is CORRECT.
Question 11
For rule substitution questions, the key is to figure out what the rule that is being replaced does in terms of restrictions and shaping the diagrams. Let’s have a close look at the game board. Where could J and G even intersect?:
- Not group 1: G can’t go there. (rule 1)
- Not group 3: J can’t go there. (rule 2)
So J and G could only even possibly be placed together in group 2:

Therefore, we could replace the rule by focussing on group 2 and forcing J or G out of there when one is in.
B does that, and B is CORRECT. It says that if J is second, G must go third (i.e. not in group 1, and not in group 2 with J). This new rule makes it impossible for G and J to be together anywhere: rule 1 prevents overlap in group 1, the new rule overlap in group 2, and rule 3 prevents overlap in group 3.
Another possible correct answer would have been the inverse of this: If G is placed in group 2, J must go in group 1.
And that’s it! Rule substitution questions can really be this simple. Remember, LSAC isn’t working with many tools here. They have to use the remaining rules and restrictions in order to replace the rule. So by careful study of the existing game, you can figure out how they must do the replacement. It’s all about looking at the other restrictions and seeing how they interact with the variables in question.
Alternate Approach: Process of Elimination
You can also do process of elimination. The other answers will allow things that shouldn’t be allowed (i.e. G and J together somewhere) or forbid things that should be allowed. This process of elimination is slower, but still viable if you can’t figure out the structure. And the structure may come to you as you eliminate.
Two tips to speed up your process of elimination:
- There are now only three rules, in addition to the answer choice’s rule: FG not in first, JL not in third, F must be with G/H
- Remember that you are trying to do one of two things: 1. make a working scenario, which obeys the rule in the answer, but yet puts G and J together in group 2, or 2. Show that the rule forbids a scenario that should apply.
So to show G and J being together despite the rule, start with GJ in group 2 and see if you can still do the rule.
If you can’t, instead, start with the rule, then see if it blocks you from making a diagram that obeys the other three rules. This is the most common way for answers to be wrong: new rules commonly forbid scenarios that obey all the old rules.
A is wrong because it allows G and J to go together if H is in the third group:

C is wrong because it forbids this scenario which normally should be allowed. To disprove this answer you have to put J and F far apart. So I put J first and F last, and checked if I could make a working scenario. You normally can:

D is wrong because it forbids this scenario which should normally be allowed. To disprove this answer you have to put J and G far apart. So I put J first, G last, and checked if I could make a working scenario that obeyed the rules:

I found E tempting, because I thought J and L were interchangeable. Doesn’t this answer produce the same effect? Sort of: this answer makes L the new J, and with this rule L behaved exactly as J did before. But, that isn’t what we’re trying to do. We’re trying to forbid J and G from being together! And with this rule, they can be, as in this scenario:

Game 3: Academic Society Meetings
Game 3 Setup
We’re told that six meetings will be held across two semesters, Fall and Spring. There will be 3 meetings per semester. The first two rules have the same format:
- If Honolulu hosts in Fall, Montreal hosts in Fall
- If Vancouver hosts in Spring, Montreal hosts in Spring
You can draw these like this:

The third rule says each group needs one of Montreal or Vancouver:

You could make some scenarios from this, but I actually found it easier just to firmly commit those rules to memory, and then go with any new rules each question gives. Four out of six questions add a new rule, and the other two are process of elimination questions.
It is helpful to add some defaults though when making scenarios:
- If unsure what to legally put in a group, put HM in fall or VS in spring. You know those work and eliminate a constraint.
- Either V or M is a good choice in a group if you already fulfilled the constraint in the first bullet. Since you need one of V or M in each group.
- Exactly one city goes twice. Every other city goes once.
- There are no other ways to break the rules. This is a very permissive game.
Game 3 Main Diagram
The setup section explains how to build this diagram.
Main Diagram
Refer to the setup to see how to make this diagram.


Question 12
Unusually, this first question is not a “acceptable order/acceptable grouping” question. Instead, that question is question 14 for this game, and it is a fair bit harder than the typical acceptable order question.
Here, this first question instead is a rule based question. When given a new rule, you should try drawing it. The new rule is that M is only in Spring, and we can deduce three things:
- M is not in Fall, so V is (rule 3)
- H is not in Fall, since M isn’t (rule 1). This means H is in Spring, since every city must host at least once
- Vancouver can’t go in Spring, since V in spring requires VT, which requires two spaces (rule 2)

This leaves Fall quite restricted. There are only 5 variables (H, M, O, T, V), and M and H can’t go in Fall. That leaves only V, T, and O which can fill Fall’s three slots. So, we must place T and O in Fall along with V!

Similar logic applies to Spring. M and H are already there, and V can’t be, so one of T or O has to go in Spring.
Since this is a could be true question, the answer will involve the flexible variables, T and O. A and C are poor candidates because they mention H, and worse they contradict our diagram: H can’t be in Fall.
D and E are wrong because O and T need to be in Fall, since no one else can go there: V already is there, and M and H are forbidden because of the question’s rule + rule 1.
Which leaves B, which is CORRECT. Either T or O could be in both semesters.
Question 13
This question places O twice. I’ve put a box around the consequence: both Fall and Spring only have two open spaces:

That’s interesting. Because look at rules 1 and 2: rule 1 requires HM if H is in Fall. Rule 2 requires VT if V is in Spring.
Conclusion: to put H in Fall or to put V in Spring fills all the available space in the semester. So putting any other meeting in either semester will block either rule from happening.
We know each city has to go at least once. We can try building scenarios using one of the more restricted points to see what happens. I chose to use H: it’s restricted because it needs M if it goes in Spring. But you could also have made scenarios with VT.
So let’s make a scenario with H in Fall, and one with H in Spring. First we’ll place H in Fall. If H is in Fall, then M must be too:

V and T are left to place, and they have to go in Spring as those are the only open spots:

Now let’s see what happens if we put H in spring:

Notice that there is now no space to put VT in spring (rule 2): we’d need two spots but only have one. However, rule 3 says that we need either V or M in each season. So since V can’t go in Spring, M has to go there:

Next, V and T haven’t been placed. The only open space is Fall, so we need to put them both there:

So, comparing both scenarios, we see that HM and VT need to be together in either one. So look for answers that say either: “VT must be together” or “HM must be together”. E is CORRECT. It says that VT must be together.
Question 14
We’re looking for an impossible partial assignment of cities to semesters. This is a difficult question, and to solve it, the best approach is actually to quickly copy the answers onto your scratch paper. Then fill in letters based on the rules until you find something impossible. I’ll show you how I actually drew it. I just wrote letters on my sheet and partially filled things in.
A few tips for filling things in:
- Start with any existing rules triggered by the variables placed
- If you can, place VT in fall or HM in Spring or place either pair of variables together. You know these combos are possible, so it makes sense to default to them when trying to prove an answer could be true.
- Place H, V, T, M first. O can go anywhere, so placing the tricky variables first allows you to be sure you’ve handled the hard bits.
A: This answer has H in F, and V in S, so start by fulfilling rules 1 and 2:
F: H, M
S: H, V, T
Only one space is left (in fall), and O can go there.
B: This answer has M in F, and HT in Spring. First, put V with T in Spring and H with M in Fall. The rules don’t force us to put those there, but since each combo fulfills rules 2 and 1 respectively, we know the combos work. When testing a could be true scenario, it’s always good to fill in things you know work.
F: M, H
S: H, T, V
Once again, we’re left with just O. This is the exact same diagram as A!
C: This starts with O in Fall, and MT in Spring. So I just added VT to fall and H to spring to go along with M. As with B, nothing forces us to put these letters together. But we know they can go together, and so for the purposes of knowing if an answer works it’s what I default to. They also help fulfill rule 3 by ensuring each group has M or V:
F: O, V, T
S: M, T, H
This obeys rules 1, 2 and 3
D is CORRECT. It places H and T in Fall and M in Spring. Let’s see what deductions we can get. H in Fall requires M. And, V has to go somewhere, so we have to put VT in Spring (rule 2 requires T with V):
F: H, T, M
S: M, V, T
So far so good. The problem? There’s no space for O! And every city needs to be placed.
E: This places H and V in Fall and V in Spring. It is very similar to D, except that V instead of M is in Spring, which allows this answer to work. So, let’s obey rules 1 and 2 and put M with H and T with V:
F: H, V, M
S: V, T
Only O is left to place, and we can place it in Spring. Notice a pattern. A, B, and E all had O as the remaining variable once we applied the rules.
Question 15
We’re looking for a combination that can’t go together in either semester. There are actually only three ways for an answer to be illegal:
- To have H without M in Fall
- To have V without T in Spring.
- To have a season without V or M
If you quickly skim the answers, you’ll see that each has V or M, so no answer can be proven based on that. We’ll have to use the first two rules.
To evaluate answers, think about what would be hardest. It would be an answer with neither H nor V (leaving them both in the other group) or an answer with both H and V, making at least one rule apply no matter which group they’re in.
C is CORRECT. It has both H and V. Let’s consider what happens if we have H, O and V together:
- If we put them in Fall, there is no space for M (rule 1)
- If we put them in Spring, there is no space for T (rule 2)
So either way we violate a rule.
For the incorrect answers, you can refer to diagrams and reasoning in the previous questions to eliminate A, B and D. If you have your diagrams clearly arranged on scrap paper it should be very quick to scan over them and find scenarios that prove wrong answers are possible.
A can be eliminated since H, M, and T can show up together in this diagram from Question 12:

H, M, and V also host together in this partial diagram from Question 14, so we can eliminate B:
F: H, V, M
S: V, T
The same is true of D. In the diagram above, the final spot in spring is open. There are no remaining rules, so we can place H there, and we’d have Honolulu, Tampa and Vancouver together legally.
As for E you can show it is possible with this scenario:
F: M, O, V
S: H, T, M
This obeys all three rules.
Question 16
This question tells us that T is the repeating variable that appears in both semesters. There are five variables and only six slots. Meaning only only variable goes twice: in this case, T. So everyone other than T can only go once.
Think about which variables are most restricted. Each group needs either V or M. And now we know they each can only go once. So, V and M must be in opposite groups. We can make two scenarios: one where M is in the Fall and V is in the Spring, and vice versa.
The only remaining rules is:
- Rule 1: If H is in Fall, M must be. If M isn’t in Fall, H can’t be.
What about rule 2? It’s now redundant. T is in both groups, so “V —> T” has no meaning: T already is anywhere V can go.
Scenario 1: M in Fall, V in Spring
So let’s make the diagrams, remembering there’s just one rule. Let’s put M in Fall first, and V in Spring:

This doesn’t trigger the one rule, so H or O can be in either group.
Scenario 2: M in Spring, V in Fall
For the second diagram, V is in Fall, and M is in Spring:

In this case, the rule does apply: M isn’t in Fall, so H can’t be. Therefore, H goes in Spring and O goes in Fall:

Now that we have all the possibilities, we can go through the answers and find the one that’s possible. B is CORRECT. In the first scenario, both M and O are in Fall.
C and E are both wrong for the same reason: rule 3. T has gone twice, so there’s only space for other variables to go once. And each group needs one of either M or V. So, M and V can’t be in the same group!
A is wrong because it puts too many people in Fall: the answer already has T, H and V in Fall. But if H is in Fall, M must be as well. That’s four people! (This answer is also wrong because it would place both M and V in the same group, leaving none of them to go in Spring).
As for D, the problem becomes clear if you draw the full groups. This question places T, M and O in Spring. We have to place all variables at least once, so V and H need to go in Fall:
F: T, V, H
S: T, M, O
This violates rule 1: if H is in Fall, M needs to be too.
Question 17
H hosts in the Fall, so M also has to host in the Fall (rule 1).
Each of the other three variables (V, T, O) has to be placed at least once. Of those two, V is the most restricted variable, due to rules 2 and 3.
So let’s make two scenarios using V. We can make one scenario where V is in Fall, and then another where V is in Spring.
Note that we could place V twice. The point of the scenarios is to start with V in Fall, or V in Spring, and see what else happens from that. But it’s no trouble to place V in the other group if it makes the scenario work.
Remember: in either scenario, HM will be in Fall. H, because the question places it there. And M, because if H is in Fall, M must be too.
Scenario 1: V in Fall
First let’s place V in Fall:

If V is in Fall, then T and O are left to place and must be placed in Spring:

The final slot will be either M or V, since rule 3 says each group needs one of M or V. (It’s fine for V to go twice in this scenario. It doesn’t have to, but it can. The point of this scenario was to see what happens if V definitely goes in Fall).
Scenario 2: V in Spring
Now, let’s place V in Spring. This forces T in Spring (rule 2):

O is the fifth variable, and it can go in either group.
Every rule is obeyed in the diagram above, so anyone can be the variable that goes twice: V, M, H, O, T. In either season! There are no rules in this game that prevent someone from going somewhere once the rules are met.
Between the two scenarios, there is one constant: T is in Spring. So D is the CORRECT.
B and E are wrong because scenario 1 shows that either M or V could host in the spring. Since either could, neither has to.
A and C are wrong because of scenario 2. This scenario is quite flexible: O can go in either season.
Game 4: Theatre Festival Plays
Game 4 Setup
This game is quite similar to PT 37 Game 4, which also has a repeating sequence. You should try game that after going through this explanation. Be warned that game may be a little bit harder than this one.
There’s 8 days so we can put down 8 slots. We’re told that the same play is performed on days 1 and 5, and another play is performed on both days 2 and 7.
You should absolutely represent this directly on your diagram. There are at least two good ways to do it. One is to make plays 1/5 X, and plays 2/7 Y, then draw these above the diagram:

So, whatever play goes under X needs to be the same, and the same for Y. The second way to represent this is with curved lines. The two variables touched by each line need to be the same:

Pick whichever version you find clearer, or come up with your own system. But don’t say “oh I’ll just remember this” and don’t write “1 = 5” in your list of rules, away from the diagram. In the heat of the moment you need a clear visual reminder on the main diagram. Success in logic games is mostly about not forgetting the rules, so they need to be blindingly obvious.
For my own diagrams in this game I chose the curved line version. Note that on my own scrap paper, I probably wouldn’t draw the curves for local diagrams: I’d only have them on the main diagram. But for clarity in these explanations I put the curves on most diagrams.
Rule 3 tells us that M and O can’t be next to each other, in either order:

Rule 4 tells us that there is at least one HM block, in this order:

Rule 5 tells us that J has to go before any H. Since H could repeat, we want to be clear that both H’s come after J. I drew it like this:

A word of caution: this doesn’t mean that H must go twice! It only means that if H goes twice, then J is before both. But what is 100% certain is that there is a J-HM sequence.
This lets us infer that H can’t be first, since J needs to come before H (rule 5). Hence, H also can’t be fifth, since both first and fifth need to be the same play (rule 1):

G and L are the random variables: they have no restrictions. You can represent this by drawing circles around them:

There isn’t much you can do upfront, but note that HM is the most restricted variable:
- It needs two spaces. So if a question blocks open spots, this heavily restricts where HM can go.
- J has to come earlier than HM.
- H can’t be first or fifth.
So HM should be the first constraint you check when setting up a question.
Note also that you need to watch spaces 1/5 and 2/7 carefully. For example, if on some question you deduce that a certain variable can’t go fifth, then that variable also can’t go first. 1=5 and 2=7, right down to the rules for who can’t go in those spots.
Numerical Distribution
In this game, there are eight spaces and six plays. That means two plays go twice. Which ones? Fortunately, we have an easy answer: The plays that go 1st and 5th, and 2nd and 7th, go twice. These are the repeating slots from rules 1 and 2.
All other plays go once!
Game 4 Main Diagram
The setup section explains how to build this diagram.
Main Diagram
Refer to the set-up to see how these diagrams were made.
Main Diagram

Note that the curves lines mean that slots 1 and 5 have the same variable as each other, and slots 2 and 7 likewise have the same variable as each other.
Rules

Question 18
For acceptable order questions, go through the rules and eliminate answers one by one. You can also refer to your main diagram if you need help visualizing this.
Note that I use the rules themselves. I don’t use my diagrams for these questions. Reading the rules again for this question will help you memorize them, and it’s also more efficient.
Rule 2 eliminates E. second and seventh need to have the same plays. But here, J is second and G is seventh.
Rule 3 eliminates C. O can’t go beside M.
Rule 4 eliminates B. H needs to be before M at least once.
Rule 5 eliminates D. J needs to go before any performance of H.
A is CORRECT. It violates no rules.
Question 19
We solved this question in the setup. J needs to come before H (rule 5). So that means H can’t go first. And, rule 1 says that anyone going first must also go fifth (rule 1). Since H can’t go first, H therefore can’t go fifth. Thus, D is CORRECT.
Look what happens if you place H fifth. Apply rule 1, and you have to make H first:

Which leaves no space for rule 1 (J goes before H), so it’s impossible to put H fifth.
Question 20
If O is performed on day 3, that means that M can’t go on days 2 or 4 (rule 3). This also means M can’t go on day 7 (rule 2). All these restrictions heavily affect H, which needs to go before M at least once.
HM can now only go in two places. I highlighted them with boxes. Try to place HM anywhere else, and you’ll either have an H over a “not H” or an M over a “not M”.

(You might wonder why you can’t place HM in 6 and 7. It’s cause if you have M in 7, you’d have M in 2, and them M would be beside O. So only 4/5 and 7/8 work)
So, we can make two scenarios, one with HM in 4/5 and one with HM in 7/8.
Scenario 1: HM in 4/5
Let’s start with 4/5. Since M is in 5, M must also be in 1 (rule 1):

Next, we need to put J before H (rule 5). The only space to do that is slot 2, which means J must also go in slot 7 (rule 2):

G and L are random and can go in either spot.
Scenario 2: HM in 7/8
Next, let’s draw HM in 7/8. H has to go in slot 2 as well, since 2 and 7 need to be the same (rule 2):

Next, we have to put J before H (rule 5). The only space before H is slot 1. So J goes there as well as slot 5, since both slots 1 and 5 need to be the same (rule 1):

G and L go in the remaining two spots, in either order. This is possible because G and L have no rules.
This question is asking what could be true. Since we have both scenarios, we can check each answer against them to see if it is possible.
A isn’t possible. G can’t go on day 2, because in one scenario J goes second, and in the other scenario, H does.
B is CORRECT. In scenario 2, H is second.
C is not possible. Slot 1 has M in scenario 1 and J in scenario 2.
D is not possible. L can’t go on day 7. In scenario 1, J does. In scenario 2, H does.
E is not possible. If M went 7th, it would have to go 2nd (rule 2). This would place it beside O, which is in slot 3 on this question. That violates rule 3: M and O can’t be beside each other.
A, C and D might have seemed like tempting answers because G and L are plays with no restrictions. However, placing O third adds so many constraints in this game that it just doesn’t work. G and L can only go very few places
Question 21
This is a local question. If H is performed on day 2, then it is also performed on day 7 (rule 2). There’s only one spot open before H, and rule 5 says J has to go before H, so J goes first. This in turn requires J to go fifth (rule 1).

Remember, since J and H go twice, all other variables go only once. G, L and O are left to place, and a single M after one of the H’s (rule 4):

The only rule remaining is that O can’t go beside M (rule 3). So, if you place M third, then O can’t go fourth. Apart from that, there are no restrictions.
From this diagram, we can see that L can perform on day 8, so C is CORRECT.
I just imagine L sliding to day 8 in my mind. But you can also draw it out. If L went on day 8, then M would go on day 3, O on day 6 (to be away from M) and then G on day 4:

A is incorrect since J must be played on Day 1, so G can’t go there
B is wrong: it would force J to go three times. J is already playing on days 1 and 5, so if J went third it would go three times in total. Each variable can go twice at most: only those on days 1/5 and 2/7 can repeat.
D is wrong. Since we need an HM bloc, M has to play on either Day 3 or Day 8. And M can only go once, since J and H are the plays which go twice. So M cannot play on Day 4.
E is wrong. J goes first in order to be in front of H (rule 5). Therefore J also goes fifth (rule 1), and so there’s no space for O to go fifth.
Question 22
If M is performed on day 2, then it is also performed on day 7 (rule 2). We know that H can’t go first, because J has to go before H (rule 5). But there has to be one HM block, so therefore, H must go 6th.

Since M and O can’t be next to each other, O can’t go 1st, 3rd, 5th or 8th. Therefore it must go fourth. This proves that E is CORRECT.
As for the other variables, J can’t go 8th, since it has to be before H (rule 5), but otherwise, it can go first, third or fifth. As for G and L, they have no rules and can go anywhere.

A and B are wrong. The diagram shows that H must go 6th.
C is wrong. J could go on Day 1, but it doesn’t have to. You might have been tempted by this thinking that J has to be before H. The problem is that H goes quite late on this question, so any slot before 6th is fine for J. J doesn’t need to go before M.
D is wrong. L can go 8th, but doesn’t have to.
Question 23
This question says O is performed on day 8, and L is performed on day 7. Anything on day 7 also goes second (rule 2), so L goes on day 2 as well:

HM is the most restricted variable, so we have to think where the HM block can go. Only the four slots in the middle are open. Further, H can’t go fifth since then it would also have to go 1st (rule 1). That wouldn’t leave space for J to go before H (rule 5).
So HM can only go 3rd and 4th, or 4th and 5th, and we now have 2 scenarios. In the first scenario we place HM in 3rd and 4th. In the second scenario, we place HM in 4th and 5th. In scenario 2, M also goes 1st because of rule 1.

Only G and J are left to place in each scenario. Note that both scenarios are now quite restricted: scenario 1 has three spaces and scenario 2 has two spaces.
In both scenarios, we must put J before H (rule 5). In scenario 1, this means J goes 1st, and also 5th (rule 1). In scenario 2, this means J goes third:

Both scenarios now only have a single space open: 6th. And both are missing a single variable, G. So, in both scenarios G must go sixth: A is CORRECT.

The incorrect answers are interesting. It may seem tempting to say J must go first. But, that is only true in scenario 1, so if you picked C, presumably you only found the first scenario. In that scenario, J does have to go first. The problem? In scenario 1, H also has to go third, and M has to go fourth. It isn’t possible for B, C and D to all be correct. So you can eliminate these answers for being contradictory.
(It’s possible you picked C because you thought J has to go before M, but that’s a mistake. J only has to go before H. It’s true that H is linked with M, but H can go before the second M. This leaves plenty of space for J to go before H. And if M goes twice, this allows the first M to be before J. You can see all of this illustrated in scenario 2, where the order is M – J – HM.)
So, scenario 2 eliminates B, C and D. As for E, scenario 1 proves that E doesn’t have to be true.
This is considered a very hard question, but it doesn’t need to be. The key is to go methodically through the steps and build two scenarios. Remembering that HM are the most restricted elements and using them to split the game into two scenarios is the key. Remember also to read the rules very carefully if you hit confusion on a question. Confusion often means there’s some error in the interpretation of the rules or you’ve missed one.